Before I started this class, I figured that my morning routine was simple. However, after nine months of physics, it is not as simple as I once thought. The static shock from my car in the winter was habitual, and the coffee cup falling off of it was old news. However, physics has changed my perspective on my morning. Let me set the scene...
One morning, I miraculously woke up early on my own and thought it would be fun to curl my hair. As I went to plug the iron into the outlet, I remembered that it was safe to stick something into one socket, but not both at the same time because that would complete a circuit and cause a charge. I carefully plugged the appliance in, and my hair looked great.
Next, I went to start the car, but since it had just snowed, it had trouble starting. Luckily I knew that since it was cold, the wires in the car were less likely to carry current, and this was why no energy was getting to the engine. I tried starting it a few more times before it turned on, and then I proceeded to turn on the heat full blast.
As I was driving through my neighborhood, I thought about how the wheels in my car propel me forward. The outer rims of tires are longer, but complete fewer revolutions. The inner part of the tire is shorter in length, and therefore must complete more revolutions to keep up with the outer part. The outer part has a higher rotational inertia because it is harder to rotate. Likewise, the inside part has a lower rotational inertia because it can make revolutions easier.
Having completed the motor lab, it was a realization to me that in a nutshell, my car operates on a magnet and a current carrying wire. Although it is a bit more complicated, I think that its wild that a motor consisting of two materials can create something as complex as a car.
Now driving down the hill to Starbucks, I see that the light at the bottom of the hill changes to red. I'd better slow down if I don't want to crash! I put my foot on the brakes and remember that the force of friction is equal to the net force of the car. If my car weighed 2000N, then the ground is pushing back on the car with 2000N of force in order to make it stop.
Once I safely get to Starbucks and order my coffee, I set it on top of the car while I put my bag in the back seat. I sit in the driver's seat ready to go when a stranger yells, "Hey you, your coffee's on the car! It will fly off when you start driving!" Jokes on them, because I know that according to Newton's First Law, objects in motion or at rest will stay as such unless acted on by an outside force. Because the cup is at rest on the top of my car, it will fall directly below where it was sitting if I moved quickly.
Now in the car with my coffee, I remember to put on my seatbelt! They are extremely important because as Newton's First Law states, all objects in motion or at rest will stay as such unless acted on by an outside force. If I was riding in a car and got in a crash, my body would continue to move forward because I am inside the car. Luckily, seat belts act as an outside force that stops me from going through the windshield.
As I merge onto I-240, I realize that there isn't another car on the road which means that I can safely drive on cruise control for a few minutes. Just like the coffee cup at rest is at equilibrium, so is my car when at cruise control. There is no net force acting on the car, and it can go at the same speed forever without stopping (if gas didn't exist).
Finally I arrive at school, but no matter which way you drive onto campus, there is a steep hill that you have to drive up. Going up a hill is work because there is a vertical distance and a force. You cannot directly increase or decrease work, but you can change the distance or force by using simple machines such as pulleys and ramps.
I pull up to the day hall and sip some coffee. I get out of the car, and when I go to close the door behind me, I remember what we learned about force and lever arms the day before. Force and Lever Arm are inversely proportional, so if I tried to close the door close to the hinge, it would be difficult because the force is strong and the lever arm is short. This is why it is much easier to close doors by the handle so that there is less force.
Who knew that all of these things and more would be present during one 30 minute journey to school! Physics is everywhere- you can run but you can't hide! Actually, running involves physics because of action-reaction pairs, but oh well.
Monday, May 18, 2015
Thursday, May 14, 2015
Wind Turbine Post
Background
The concept that this project revolved around was Electromagnetic Induction. In the context of a wind turbine, the magnets interact with the current carrying wire, and change the magnetic field. This induces a voltage and causes a current which results in a torque in the water bottles. Energy is conserved in the generator. All generators start with mechanical energy, but later produce electrical energy. (friction) (newtons laws)
Materials and Methods
Most of the materials we used can be found at CVS or a grocery store, and we only used two from our teacher. We bought a foam board, low grade washers, and a plastic water bottle that had no curves. We were provided with magnets, wire, electrical tape, and a hot glue gun.
(photos)
Results
The most difficult obstacle we faced was the coiling of wire. We had no problem making sure that they were all in the same direction, but we wound them too tight and had issues getting them off of the cardboard. We also learned that no amount of tape is too much. We secured everything with electrical tape so that it would not fall apart, it worked well. Don't focus on having a pretty wind turbine because ours was pretty special looking and it worked. I would advise future physicists to build the generator first and make sure that works. Then, add the framework because that does not matter as much. Make sure that you have all of your materials handy because while it may take a day or two to build one part, other parts may be built quickly. I would have done this because we were a little crunched for time, and were unable to progress quickly because we didn't have everything together from the beginning.
Tuesday, May 12, 2015
Unit 7 Summary- Magnetism
One of the big ideas in Unit 7 was Electromagnetic Induction. We learned about commercial applications like how credit cards work, how traffic lights work, and what goes on in those pesky TSA check points. As an overall rule in this unit, we had to understand that a change in magnetic field induces voltage and causes a current. This was fairly easy to apply to traffic lights and credit cards, but more difficult to use it when understanding generators and transformers. A generator's goal is to generate current, but there are various components that must be present for it to work. Generators work opposite of motors. A magnet passes through a loop of wire, changing the magnetic field, inducing a voltage, and causing a current. It first uses mechanical energy to spin something over coils of wire, but then changes to electrical because of electromagnetic induction. Transformers are a simpler concept, but have a few qualities. There are step up and step down transformers which allow the right amount of voltage or current to pass through and get power to a destination safely. Important formulas to remember are P-primary= P-secondary, Iv=iV. Because of this, power is conserved. By using AC current in the primary, the magnetic field in the secondary changes. Also, #loops primary/v primary= #loops secondary/v secondary.

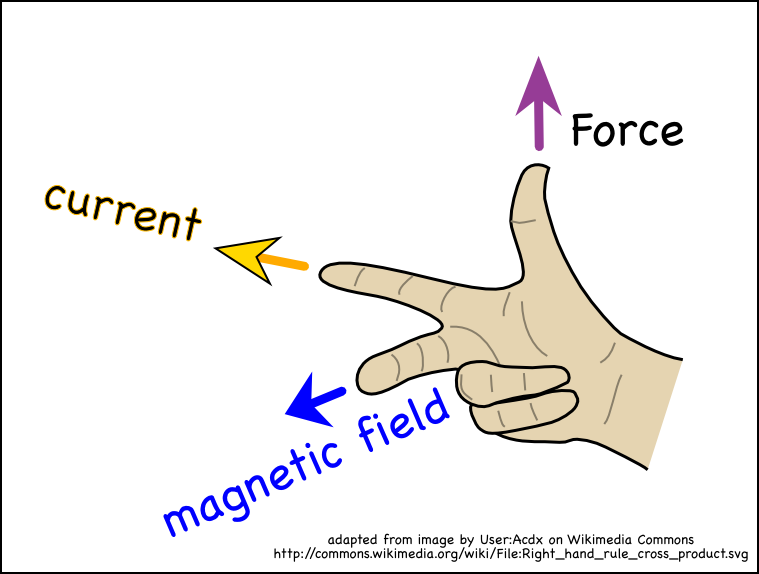
Our second big theme was Forces on Moving Charges. Regarding cosmic rays, we learned that charges have to be moving parallel to the magnetic field to feel no force when entering the earth's atmosphere. If they are moving perpendicular, then they will feel a force from the earth's magnetic field, and will be repelled back into space. While this also pertains to Magnetic Fields, knowing that charges always flow from magnetic south to north inside the field. The right hand rule came up during this theme, and it should be noted that I-index finger-current, M-middle finger-magnetic field, and F-thumb-force. When solving problems, using this right hand rule is important to determine where the missing value is pointing. In class, we assembled small motors consisting of a battery, a magnet, paper clips, rubber bands, and a coil of wire. This electrical energy turns into mechanical energy. The current carrying wire feels a force in a magnetic field and causes a torque which causes the motor to spin.
Lastly, we discussed magnetic fields which flow from magnetic south to magnetic north. The source of all magnetism is moving charges. There are spinning electrons that are clustered into domains. The electrons can be unaligned, where the electrons are pointing in all different directions or they can be aligned where they are pointing in the same direction. Back in Chemistry, we learned that opposites attract, and like charges repel. To go further, like charges repel because the direction of the field lines are opposite directions, and they push against each other. Likewise, opposite poles attract because the field lines are going in the same direction.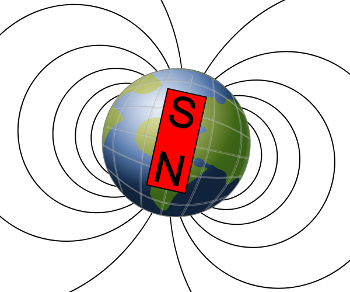
Friday, April 24, 2015
Motor Blog
In the motors we assembled in class, we used a specific and limited set of materials: a battery, two paper clips, a small magnet, rubber bands, and a copper wire. Each of these objects served as part of a larger mission to get the wire to spin.
The battery serves as a charged object, and the paper clips carry the charges to the copper wire. The wire is scraped on one side on each end allowing the current to get through. The magnet rests on top of the battery, attracting the charges of the copper wire, causing it to spin. Lastly, the rubber bands keep the paper clips connected to the battery.
The motor turns because of its interaction with the magnet on top of the battery and the magnetic field that it puts off. The total force of this object is going up, and into the loop, forcing it to move.
This motor could be used as a small fan, maybe for a mouse in the summer. Blades could be attached to the ends of the wire, and the wire would continue to spin, creating a fan.
Tuesday, April 14, 2015
Electricity
In this unit, the overarching theme was electricity. We began with static electricity found in winter caps and laundry without drier sheets. We learned that there are three types of transfer: friction, contact, and induction. Before we could fully understand what happens in these situations, we had to refresh our memories about protons, electrons, and how they interact with each other. We then discussed electric fields and shielding, with the example of why electronic devices are kept in metal cases. From there, we talked about capacitors and electric potential. Ohm's Law followed that, where we learned about the relationships between current (I), voltage (V), and Resistance (R). Using our knowledge of current, we learned about the different types of circuits and how electrons play into that.
Charges and Polarization
A big question that we answered in class was why your hair sticks up when you take off a hat in the winter. Knowing that electrons are negative and protons are positive, we were able to understand that like charges repel, and opposite charges attract each other. The friction of the hat causes the hat to steal the electrons, and make all of the hairs on your head positive. Because like charges repel, the hair separates and stands up. There are three ways that energy can transfer: friction, contact, and induction. Friction is the rubbing of two charges objects, contact is touching, and induction is the action of something being charged without touching it. Polarization is related to Coulomb's law which is F=kq1q2/d^2. When a charged object contacts a neutral object, the neutral objects charges separate so that the charged object can react with it. This is the topic where we recapped on the inverse square law.
Electric Fields
My group did our podcast on this topic, and we focused a lot on Coulomb's Law and why electronics are cased in metal containers. This is because of the neutral electric field that the device must maintain. Electronics have circuit boards that require all charges to stay in their assigned locations. The metal case protects the charges from influence, and allows the whole device to remain neutral and feel no force.
Electric Potential/ Capacitors
The main question we were asked in this sub-unit was why photos cannot be taken as rapidly when the flash is on. This is because the flash acts as a capacitor which means that within the device there are two oppositely charged plates. They continue to gain charges through energy, and once they gain enough charge, they connect briefly. This connection results in a release of energy in the form of light and sound. Because this process takes so long, it is hard for the flash to work as continuously as a camera without flash. Also during this sub-unit, we tackled the meaning of two different terms that sounded very similar. Electric Potential Energy is stored energy in charges, while Electric Potential is the Electric Potential Energy/Charge.
Ohm's Law
Through a lab, we learned that Ohm's law is I=V/R. While we understood how to substitute values into the variables, it was a good refresher of which variables were directly or inversely proportional to each other. Current and Voltage are directly proportional, while Current and Resistance and Voltage and Resistance are inversely proportional to each other.
Current, Power, Electrons
The two types of wiring that we discovered were parallel and series. Parallel circuits are the most common, while series circuits are found in fuses, and the notorious christmas light problem. An important formula that we learned was that power=current(voltage) or P=IV for short. Parallel circuits allow one source to go out and all of the others stay on. However, series circuits all rely on one source to keep many lights on.
Tuesday, March 3, 2015
Mousetrap Car
In our construction of the mousetrap car, we discovered that Newton's first, second, and third laws were present in the car. Newton's first law that states, "Every object in motion will stay in motion unless acted on by an outside force." In this case, the outside force was the friction of the tape-covered wheels on the ground. If the car had been like the hovercraft, it would have gone on forever. Newton's second law that states, "A=f/m" was important because of the variable of mass. If we had made the car too heavy, the force of friction would be too great for the car to move. Another force present was the force of the spring being released and propelling the car forward. Lastly, Newton's third law states that, "Every action has an equal and opposite reaction", is in effect because when the wheels push back on the ground, the ground also pushes the wheels forward. Something that can be hard to avoid was the possibility of centripetal force, but luckily Ella and I were able to create our car without that factor.
In our car, the wheels relied the most on friction. They needed it to move forwards, but it was easy to create too much friction. We found this during our first few trials because we realized that the tape on the front wheels was restricting the potential the car had to move forward. Friction is a good thing, but not in excess.
We chose blank CDs to be our wheels and I am glad that we did because the bigger the wheels are, the larger torque there is due to its diameter. However, the big wheels created a larger rotational inertia which means that the wheels were less likely to want to spin. The CDs also had a large tangential velocity because of their large diameter and had a small rotational velocity because of the same reason.
In our recent unit, we learned about the difference between potential and kinetic energy and the mousetrap car was an easy example to see where they differ. Because kinetic energy is the movement of energy, it is not present until the string is pulled back and causes the car to move forward. Before that happens, the car does have energy, but it is potential. However, the second that the lever moves backwards, the energy transitions from potential to kinetic.
In the car, we cannot calculate the work that the spring does because it is perpendicular to the axel. In result, we cannot calculate the potential or kinetic energy because all three values would be equal to each other.
Reflection:
Our final design remained fairly similar to the original except we had to shorten the lever arm to allow a larger force. This was one of our problems, and also we had problems with the binding of string. It took us a few days to figure out the best way for it to be wrapped around the axel, but we figured it out. To make the car faster, I would use a heavier base, probably a plank of wood. We used a form of plastic cardboard, and it was too flimsy to be able to travel a significant distance. If I were to do this project again, I would make sure to have my materials on time and be more familiar with the construction of the car so I would be comfortable making serious changes if needed.
Speed: 0.62 m/s, last place.
Sunday, February 22, 2015
Unit 5 Blog Summary
In this unit, we have studied different forms of energy and the measures of work and power. We did a lab to find out how work and power are related, and that was really helpful when energy came into play because all three of these ideas are intertwined. We learned that kinetic energy, the energy of movement, is different than potential energy, but both are equal to work and are all measured in Joules. Towards the end of the unit, we touched on the conservation of energy which was a nice refresher about how the conservation of momentum works. Seeing similarities between these two topics made it easier to understand the purpose of the conservation of energy.
 The first topic we discussed was work. Work is equal to (force)(time), and is measured in Joules. Next, we learned that power is the time in which work is done, and is measured in watts. In the lab we did where we walked, ran, and walked with weights up three flights of stairs, we were able to calculate our weight in joules, the work we did, and the amount of power it took. Through the course of this year, I think that this has been the best hands on experience of physics. Although I have been able to recognize it in my daily life, the lab helped me better understand the topic of work and power.
To help myself review, I made a Quizlet with the formulas I needed.
work= (f)(d) :joules
power= work/time :watts
1 horsepower= 746 watts
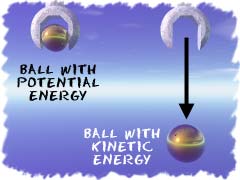
After we were comfortable with the concept of work, we brought in kinetic energy, which is the energy of movement. Obviously a resting object cannot have kinetic energy, but all objects do have potential energy. In the example we often used in class, a ball is resting on the top of the cliff, where it only has potential energy. However, just before it hits the ground, it has the same amount of energy, but it is now kinetic since it is moving. An imperative concept to grasp is that an object's potential and kinetic energy values are equal no matter which type it is. So if the ball has 2,000J of potential energy at the top, it still has 2,000J of energy during it's fall, but it is now kinetic.
Kinetic energy= 1/2mv^2 :joules
potential energy= mgh :joules
Change in pe=work=change in ke
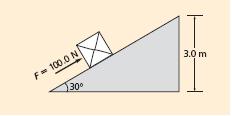 As I said earlier, a good refresher from a past unit was the reintroduction of the conservation of momentum and how it is similar to what we recently learned, the conservation of energy. In a machine, which I will get to later, energy is mostly conserved while only a small amount of energy is lost through heat or sound. An important formula to know when talking about the conservation of energy is that the work in=work out of a machine. We know that work=(f)(d), and because of the law of conservation of energy, the work in must equal the work out. A common misconception is that all machines are 100% efficient, but as I said earlier, some energy is lost due to heat and sound. In the example of a ramp that is 2m in vertical height and 8m in length, we want to push a 600N box up the ramp. Using the formula work in = work out, we can plug in these numbers to find out how much force was needed to push the box up the ramp.
Work in = work out
(f)(d) = (f)(d)
600(2) = (f)(8)
1200=f8
150N=f
Key formulas to know for this topic are:
Work in = work out

Change in PE= change in KE
Lastly, after we understood the conservation of energy, we applied our knowledge to simple machines such as ramps, pulleys, and jacks. The formula used in the previous topic, work in = work out, is vital to understanding how simple machines help us. The main goal of a machine is to decrease either the force or the distance, but not the work as a whole. In the ramp example, the factors for work in are the weight of the box and the vertical height, and the factors for work out are the length of the ramp and the unknown force.
By writing this blog, I have made connections that I hadn't before between topics and also it helped me to solidify my prior knowledge of some information. It was helpful to list the different formulas and also bold the key words so that I will remember what the unit was really about, and not get caught up in the specifics as I have in the past.
Subscribe to:
Comments (Atom)